2012 Weight Loss! GO ME!!

Created by MyFitnessPal - Free Calorie Counter

Wednesday, December 15, 2010

TIPTOE HAT knitting pattern!

021

*edited on 12-29-2010 to fix the extra stitch in the earflap
*edited on 12-29-2010 to adjust the position of the skp
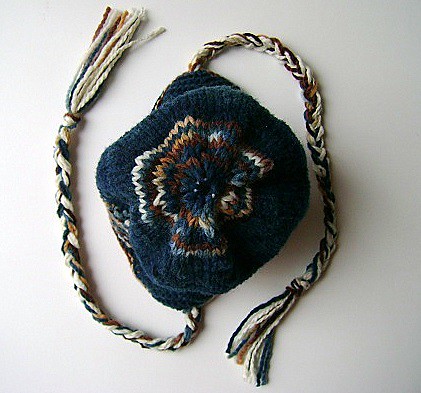
Tiptoe Hat
Designed and written by Jennifer Pimentel

Materials needed:
Size US 7 (4.50mm) 16” circular needles
Size US 8 (5.00mm) 16” circular needles
Three double pointed needle size US 8
One stitch marker
One darning needle
200-500 yards worsted weight yarn

Techniques Used:
CO=Cast On
BO= Bind Off
Linen Stitch=Knit 1, slip 1 with yarn in front
skp-slip one stitch purlwise, knit the following stitch, pass the slipped stitch over the knit stitch
K2tog=knit two stitches together
Inc=increase one stitch

Gauge:
5 stitches per inch on size US 7 Linen Stitch
Measurements (head circumference in inches)
14” (16”, 18”, 20”, 22”)
*it’s important to measure your little one’s head correctly because the linen stitch in this pattern does not provide a lot of stretch.

Sizes: newborn (baby, toddler, child/teen, adult)

PATTERN
Earflaps:
Make 2-use solid color yarn
With size US7 16” circular needles or dpn, CO 4 (4, 6, 9, 9) stitches
Row 1 KFB, knit to last stitch, KFB
Row 2 KFB, knit to last stitch, KFB
Row 3 Knit
Row 4 KFB, knit to last stitch, KFB
Row 5 KFB, knit to last stitch, KFB
Row 6 Knit
Row 7 KFB, knit to last stitch, KFB
Row 8 Knit
Row 9-20 Knit
Snip yarn on first flap, continue onto the body of hat from the second flap
Stitches on each flap 14 (14, 16, 19, 19)

Body of hat:
Using solid colored yarn
From the second earflap, CO 25 (31, 34, 36, 41) stitches, knit stitches from earflap 14 (14, 16, 19, 19), CO 16 (20, 23, 25, 30)
PM and join in the round being sure not to twist work
Total stitches on needle 69 (79, 89, 99, 109)
Knit one round
Purl one round
Switch to Main Colorway
Begin Linen Stitch
R1: *k1, s1wyif* R2: *s1wyif, k1*
Continue Linen stitch until your hat reaches 2.5 (2.5, 3, 3, 3.5) inches from cast on edge
Switch to US 8 16” (5.00mm) circular needles
Switch to solid color yarn
Knit one round
Knit second round increasing one stitch for a total of 70 (80, 90, 100, 110) stitches
Continue knitting until hat reaches 4.5 (5, 5, 5.5, 6) inches from cast on edge

Crown Shaping:
If you would like colorway on the crown portion, switch to the colorway on row 7.
Row 1: *k2tog, knit 6, skp* to the end of round (56, 64, 72, 80, 88 sts)
Row 2-5: knit
Row 6: *k2tog, knit 4, skp* to the end of round (42, 48, 54, 60, 66 sts)
Row 7-9: knit
Row 10: *k2tog, knit 2, skp* to the end of round (28, 32, 36, 40, 44 sts)
Row 11: knit
Row 12: *k2tog, skp* to the end of round (14, 16, 18, 20, 22 sts)
Row 13: knit
Row 14: k2tog to the end of round (7, 8, 9, 10, 11 sts)
Row 15: FOR CHILD AND ADULT SIZES ONLY k2tog to the end of round. This will leave 5 stitches for a child/teen size and 6 stitches for the adult size.
Snip yarn and thread through remaining stitches. Pull lightly to close hole and weave in end.

Edging (optional):
Can be done in solid or colorway
With US 7 16” needles, pick up stitches along the front of the hat, along earflap, along back and along second earflap.
Purl one round
BO loosely knitwise

Braided Ties:
Cut 12 strands of yarn 40” long each.
Separate into two piles with 6 strands in each pile.
Pull 6 strands through the center of the earflap just above the edging. Double these strands over to make each side 20 “
Make sure the ends are even.
Take two strands from front and two strands from back (three times to make three strands)
Braid together
Tie a knot at the bottom and trim ends evenly.

Monday, November 15, 2010

I need I need I need

I am in need of testers for my larger size Bayside Britches pattern.  Let me know if you are available to knit this within the next month.  Sizes 12-18 mos, 18-24mos and 2T. 

Thanks so much!  My goal is to get this out before Xmas but it's a very busy time of year so I'm not sure I'll be able to. 

Sunday, August 8, 2010

Ugh, allergies are killing me!

I've been battling some fierce allergies these last few days. I'm starting to finally feel a little bit better. I've been working on a few things.

MM "Ravensong" one of my favorite colorways. I'm so excited to finally be knitting it up. Too bad it's for a customer and I won't be keeping these gorgeous puppies.

008


Some bayside britches on Retrobaby's "Glamour Safari".  Another stunning colorway.  I think I'm going to do some brown buttons, brown cuffs and a brown shirt? 

005

And finished a matching headband to the DD "Ponies" longies I did last week

Matching headband

Tuesday, July 27, 2010

Grand reopening

I'm working on getting my store reopened.  It's had a make over and I have a new logo.  I'm super excited!  But it may have to wait.  My DH is interviewing in California for a new job.  It is 20 minutes away from where we used to live.  Could it be possible to move from CA to OH in June then move back (OH to CA) in Aug?  Crazy.  We'll see how it goes. 

I finished the Macaw longies

Macaw FO

I have a couple of things on the needles right now.  A Bay Harbor Hoodie for my 4 yr old son Kyler

001

002

and some DD Ponies longies

DD "Ponies"

Tuesday, July 13, 2010

Settling in

We're slowly settling into our home in Ohio.  It's hard to move in the summertime b/c all you want to do is go outside and swim!  I would say we're about halfway unpacked.  My DH has an interview back in California tomorrow.  Wouldn't that be crazy if we moved right back??? 

I'm beginning to work on customs again.  Also started dyeing some yarn.  It's nice to get back into the swing of things.  I took the kids to Toys R Us today b/c they've been driving me crazy!  They picked out some toys one of which is called Mighty Beans.  They're quite interesting.  They're like mini weeble wobbles and they have faces and names.  Kids can collect them.  I think they're cute!  I'm hoping that they toys I got them will keep them outta my hair for a couple of days. 

My DH approved a YARN CHEST :)  My yarn is currently in those cheapo plastic drawer thingies.  UGLY.  Can't wait to pick out a nice wooden chest and fill it up!

Current WIP: Macaw w/turq trim

Macaw WIP thumb

Monday, June 7, 2010

Wishing I could stay a California girl.

About two years ago, my family and I moved from our little town in Ohio to Paradise.  A midwest girl all my life, I had never been anywhere other than Ohio, Wisconsin, and of course Florida (for vacation).  Then my DH was offered a job training in California.  We would move across the country for two years, my DH would train someone at his job, then we would move back.  At the time, CA seemed worlds away.  But in this day and age with computers, cell phones, text messaging, email......I was never really that far away.  You see, much of my family is in Ohio.  I had never lived very far away from them EVER.  The thought of moving that far away made me very nervous.  After much thought, we decided to do it.  So we moved our family of 5 across the country to Monterey, CA. A.K.A. Paradise. 

It took some getting used to at first.  There are really no seasons to speak of.  It's pretty much between 50-70 degrees year 'round.  The people's lifestyles are different.  They actually EXERCISE VOLUNTARILY.  I know, crazy huh?  Everyone in Monterey walks everywhere.  They eat things I had never tried before (artichokes and avacados).  It took me about a year and a half to get the hang of this livin' in California thing.  It helped that the ocean was less then a mile away.  Every morning I drove along it to take my kids to school.  Their school had the most beautiful view of the ocean.  Even our front bay window had a pretty modest view. 

But now our two years are up and it's time to go back.  Our little family of 5 that moved out here will be a family of 6 moving back.  My youngest daughter was born here.  I guess all good things must come to an end right?  I will sorely miss California and all the friends I've made.  We leave in 7 days...

Sunday, June 6, 2010

Summertime Bubble Top pattern


*REVISION 6-7*
I forgot to add the decreases at the bottom of the shirt right before the ribbing.  Fixed 6-7-10

Size 12 mos
Measurements: Chest 20"
Underarm to waist 7"
Backwaist (neck to top of back waist) 8"-9"

Materials:
3.5 ounces worsted weight wool
US size 7 12" or 16" circular needle (or size needed to obtain gauge)
US size 8 16" circular needle (or size needed to obtain gauge)
US size 9 16" circular needle (or size needed to obtain gauge)
US size 5 16" circular needle-for ribbing
Five stitch markers

CO-cast on
BO-bind off
KFB-knit in front and back of stitch

Gauge
Neckline 5.5 stitches/inch
Top portion of body 5-5.5 stitches/inch
Main body portion 4.5-5 stitches/inch

Neckline:
Using US size 7 needles (or size used to obtain gauge) CO 87 stitches
Row 1 – Marker Placement
Join knitting in the round being sure not to twist
K8, PM, K25, PM, K21, PM, K25, PM, K8, PM
Row 2 Purl
Rows 3-7 K
Row 8 Purl
Row 9 K
Row 10 *KFB* 8 stitches, remove marker, BO 25, remove marker, *KFB* 21 stitches, remove marker, BO 25, remove marker, *KFB* 8 stitches.

You've completed the neckline and straps. If it's easier for you, you can put the working section on DPN's for the next few rows until you join in the round again. I kept mine on circular needles.

Transfer the stitches to your size 8 circs (or size needed to obtain gauge). Beginning at your front marker, K to the end. Work 7 rows total in stockinette stitch doing a KFB at the beginning and end of each Knit row. You should end with a purl row. Snip yarn

Work the back side in the same manner as the front. Work 7 rows total in stockinette stitch doing a KFB at the beginning and end of each Knit row. You should end with a knit row.

CO 2 stitches and join in the round. Knit around the front side, CO 2 stitches. Switch to size 9 circs (or size needed to obtain gauge) and continue knitting in the round until your piece measures 6" from underarm.

*K1, K2tog* for one round 

Make sure that you have an even number of stitches on the needles.

Switch to size 5 circs and begin K2, P2 for 8 rows or just shy of an inch. Bind off with picot cuff.

If you'd like a wider top, you can increase stitches throughout the body of the top. Be sure to space your increases a few rows apart. Usually 4 stitches per row will increase without being noticeable.

*pattern for personal use only.

Saturday, June 5, 2010

Summertime bubble top


Summertime bubble top
Originally uploaded by littletrunks

I'll be writing the pattern to this. It's a quick knit and super easy. I love it on my daughter!

Friday, April 9, 2010

Super Trim Soaker pattern

I think that Spring is my favorite time to knit.  All of those cute little dresses and sunsuits.  Shorties and soakers instead of longies.  Drying my wool outside.  What could be better?

I'm so excited to debut my Super Trim Soaker pattern.  It was really fun to write.  Thank you to all of my testers and their input.  Each one had some great ideas and ways to make the pattern easier to read and understand. 

I'm currently working on writing my longie pattern with the optional "skirt".  I also would love to get an overall/sunsuit type thingie written but it's completely from scratch and it's proving to be a little more challenging than expected.